Unit Test and Integration Plan
Test Plan Goal
The goal of the Unit Test and Integration Plan Document is to provide details of the software testing,
Integration, and Verification/Validation process which will be used during creation of the system.
This web page introduces ideas of software testing strategies, specifies the outline of the Unit Test
and Integration Plan document, and provides a detailed description of each section of the Plan document.
It is possible to develop a system that runs nearly perfectly if each component is tested on a
standalone basis as it is developed and integrated into the overall system, and if care is taken when
integrating components. On the other hand, it is possible to have a system that never or only barely
works if testing is overlooked or consciously disregarded. First we look at the purpose of testing,
then introduce various testing strategies.
What is Testing?
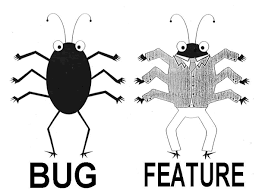 |
Testing is the opportunity to find errors when they are introduced, when it is the least expensive
to correct them. It is also a tool used to help deliver an error-free product to the customer. During
testing, of course, finding errors is the goal. However, because programmers frequently see their code
as an extension of themselves and view criticisms of their code as personal criticisms, and
because of cognitive dissonance, (a term from Psychology →
WikiPedia it) programmers often make
the worst testers of their own code. As a result, independent testing organizations (ITOs) or quality
assurance (QA) groups are created within organizations to test programs and find errors. In this class,
we don't have that luxury; we each must rely on ourselves to test our code as it is developed and
integrated.
|
Testing Objectives
Testing cannot prove the absence of defects. At best, it can only detect the
errors which we anticipate and for which we test. Therefore, testers must be
extremely rigorous in enumerating the expected results of execution, and extremely clever when
anticipating all of the ways something unanticipated could happen. A tester must execute a program
with the intent of finding errors!
A thorough tester will try all possible things that a user can do, particularly the things that a
user is not expected to do and should not do. (An easy example of such a situation is
if the user enters an alpha character into a numberic-only entry field.) To accomplish this, we write
test cases. A good test case is one that has a high probability of finding an
as-yet undiscovered error.
Drivers and Stubs
Prior to putting an entire program together, it is important to test each piece on a standalone
basis. As part of this, you will build test drivers (often called simply "drivers") and
(probably) stubs.
 |
A driver calls appropriate functions, with reasonable parameters, in order to test the
functionality of the code being tested. A driver can either be hard-coded or be a simple interface that
allows you to try various parameters. The advantage to hard-coded drivers is that the parameter values
are self-documenting, and thus are easily traced for correctness, and are easily repeated during the
life of the project. The advantage of the interface approach is the flexibility to test the function
input values on the fly — if you think of something which hasn't been checked while you are in a
test session you can immediately enter that case and test it out without having to go through a complete
re-compilation of your test case code.
|
|
A stub is a piece of code that stands in for another piece of code. We use stubs in
order to test a higher level function without being concerned about low-level details. For example,
with a chess-playing program it is impossible to test the computer player until the board class exists.
However, we can create a board class stub that has hard-coded return values for functions which define,
e.g., what piece is at each position.
|
 |
Black Box Testing
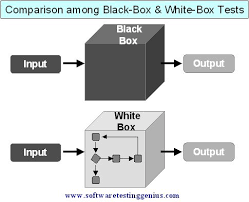 |
Black box testing assumes that we do not know how the code we are testing works. It is predicated
on testing every possible combination of calls to functions and all boundary conditions to ensure
that the code works properly.
Sometimes, testing all possible combinations of values (known as "exhaustive" testing) is
just not possible. Consider a function which takes a double-precision value as an input. To test
every possible input, even with the limits of binary representations, is just not feasible
(how many numbers exist between zero and one?). In these cases, we use "comprehensive"
testing. This means we choose a select group of test values which will prove conclusively that the
module functions correctly, without spending the time and effort to do an exhaustive test.
|
White Box Testing
White box testing assumes that we do know how the code we are testing works, and we take advantage
of this during testing. For example, with white box testing we ensure that all code paths have
been traversed. If a code path has not been taken, then we are not sure whether the code on that
path works.
Often white box testing is assisted through debugging output generated during the execution of a
program. The following is an example:
         void Board::AddPiece()
         {
         #ifdef DEBUG
         if (glbDebugOn)
         {
            glbAddIndent(); // increases indent string length
            debugFile << glbIndent << "Board::AddPiece()";
         }
         #endif

         // code for function

         #ifdef DEBUG
         if (glbDebugOn)
         {
            debugFile << glbIndent << "Board::AddPiece() 2";
            glbRemoveIndent();
         }
         #endif
         }
The contents of the debug file can be checked to ensure that each function as a whole and each
part of each function is being reached. Note: these debugging statements can be extremely useful
during not only integration tests, but also while testing the system as a whole
YOUR Test Plan Document
For your document, should you decide to implement a Software Test Plan (even though
you're not required to write one), you must produce a test plan which follows the format given by
the outline in the next section below. The test plan document covers all the tests you use to do
testing on your project, and covers all levels of the testing processes you will perform. You must
provide details of unit test, integration test, and acceptance test. The document will actually serve
two purposes: 1) to describe what is tested and how; and 2) to describe the actual test steps you will
use to prove the code and application works the way it is supposed to do. Both positive and negative
tests must be performed.
The CMMI document model will be followed, in general, because you'll need to know it and it's really
pretty good. However, the CMMI model does split things into two separate documents, a Test Plan and a
Test Procedure. If you have the SQA representative in your pocket, you'll probably get to combine the
two documents as you are doing for this class.
Outline of the Deliverable
The document should be structured as follows (sections are explained below):
            8.0    Software Test Plan
            8.1    Introduction
            8.2    Unit Test Plan
            8.2.1  Unit Tests Planned
            8.2.2  Unit Test Procedures
            8.3    Integration Test Plan
            8.3.1  Integration Tests Planned
            8.3.2  Integration Test Procedures
            8.4    Acceptance Test Plan
            8.4.1  Acceptance Tests Planned
            8.4.2  Final Acceptance Test Procedures
            8.5    Test Configuration Control
            8.6    Items Not Tested
            8.7    Test Verification Matrix
8.1 Introduction Section
Begin by describing the purpose and contents of this section of your document.
8.2 Unit Test Plan
This section provides a description of the unit testing to be performed for your project. The top
section, 8.2, should be an introductory paragraph addressing what will be tested, usually by using
the CSU names. Section 8.2.1 provides details of the unit test processes, including how the tests
are performed, and what type of testing will be used. Section 8.2.2 is a step-by-step procedure to
show how each step of the test process is performed for all modules. Keep in mind that the steps
may be "manual" steps, such as the following:
- Start the test suite application
- A dialog box will appear containing possible tests to be run.
- Select the "Controller Module A Test" from the list
- Enter the value "bozo" in the parameter entry box for argument 1
- Click the "GO" button and observe that the returned value is "clown"
- Enter the value "23" in the parameter entry box for argument 1
- Click the "GO" button and observe that the module returns an error message
. . . and so on.
The idea is to model the effects of the Verification Cross Reference Matrix (VCRM) of the Software
Development Plan, by producing a listing of the tests, inputs, expected outputs, and so on. This
could be a simple table, for example, with columns for the test number, the module being tested,
the name of the test for that module, and the inputs, expected outputs, and any stub code that is
required. Inputs should be a set, with different values used to test for "pass" and "fail". For
example, if the module is a "times 3" that returns triple the input integer, you would have test
inputs for acceptable integer inputs, along with unacceptable alpha and double-precision inputs.
Outputs should also be a set, with expected output values corresponding to the inputs; the
associations should be obvious. Finally, if there are stubs that are used to mimic operations,
the name of the stub should be listed; if there are no stubs required, "None" is fine.
8.3 Integration Test Plan
Section 8.3 follows the same format and planning as the previous section, but with the focus being
placed on testing the integration of the CSU modules into a CSC. To this end, do the same thing as
in the subsections for 8.2, including the step-by-step description of how to actually perform the
tests. For example, if a CSC had modules A, B, and C, and the plan was to integrate A and B, then
(A and B) with C, there would be a plan given in Section 8.3 for standalone testing on A, on B, and
on C, then on the integrated AB, and finally on ABC to constitute the final integration test. In
Section 8.3.1, you would give the names of the tests for A, B, C, AB, and ABC with descriptions of
the inputs and expected outputs to be used. Finally, in Section 8.3.2, you would give step-by-step
directions for each of the tests.
8.4 Acceptance Test Plan
Again, a similar format to the previous two sections, but with the focus on the total system rather
than merely single or integrated modules. This is equivalent to a full-on demonstration presented to
your customer, and is used to show her that the entire software application works the way it
is supposed to work. This is where the VCRM is most useful — if you can show the customer that
your tests all pass and that they cover all the requirements, you get paid!!
8.5 Test Configuration Control
This section should contain a paragraph describing how the test suite (at both unit and integration
integration levels) fits into the Configuration Management scheme. If you are using SVN as your CM
system, will there be a separate area for tests? Will there be two separate areas, one for unit
and one for integration? How is the build process directed to use versions of the software that
are "checked in" for everything but the module under test? These are some examples of
the questions answered by this section.
8.6 Items Not Tested
This section is a list of any items that are not tested at any of the three levels. You must also
include a rationale for why those items are not tested.
8.7 Test Verification Matrix
This section will provide a table containing all the requirements from Section 6 (the SRS section
of your SDF), along with the test which covers that requirement. It is perfectly fine to have a
test cover more than one requirement. The usual method is to have the requirement number in the
left column of the table, with columns for the requirement text, and for the test name/number.
Next Document